import requests
from bs4 import BeautifulSoup

response = requests.post(tranUrl, headers=headers, data=data, verify=False)
soup = BeautifulSoup(response.content,"html.parser")
print(soup.find(id="tw-answ-target-text").text)
return soup.find(id="tw-answ-target-text").text

verify=False 설정으로 SSL오류를 해결하고 나면 이번에는 아래와 같은 경고가  표시됩니다.

InsecureRequestWarning: Unverified HTTPS request is being made to host 'www.google.com'. Adding certificate verification is strongly advised. See: https://urllib3.readthedocs.io/en/latest/advanced-usage.html#tls-warnings
  warnings.warn(

인증서 검증으로 하라는 경고인데 아래와 같이 작성하며 경고를 숨길 수 있습니다.

import requests
from bs4 import BeautifulSoup
from requests.packages.urllib3.exceptions import InsecureRequestWarning

requests.packages.urllib3.disable_warnings(InsecureRequestWarning)          # InsecureRequestWarning 경고를 무시하도록 설정

response = requests.post(tranUrl, headers=headers, data=data, verify=False)
soup = BeautifulSoup(response.content,"html.parser")
print(soup.find(id="tw-answ-target-text").text)
return soup.find(id="tw-answ-target-text").text

from requests.packages.urllib3.exceptions import InsecureRequestWarning

requests.packages.urllib3.disable_warnings(InsecureRequestWarning)          # InsecureRequestWarning 경고를 무시하도록 설정

위 2개 코드를 추가하게 되면 해결됩니다.
◊  회사에서 Python / Request 를 사용하여 데이터 수집 프로그램을 만들다 보면 request 모듈 호출시 아래와 같은 오류를 만나게 됩니다. 그에 따른 오류 해결 방법 입니다.

url = "이런 저런 URL"
response = requests.post(url, headers=headers, data=data)
soup = BeautifulSoup(response.content,"html.parser")
print(soup.find(id="tw-answ-target-text").text)


◊ 오류 메시지

SSLError: HTTPSConnectionPool(host='www.google.com', port=443): Max retries exceeded with url: /async/translate?vet=eiv=1&yv=3&cs=1&_fmt=pc (Caused by SSLError(SSLCertVerificationError(1, '[SSL: CERTIFICATE_VERIFY_FAILED] certificate verify failed: self-signed certificate in certificate chain (_ssl.c:1133)')))


◊ 조치 방법

# verify=False 옵션을 지정해주면 SSL오류가 발생하지 않음
response = requests.post(url, headers=headers, data=data, verify=False)
soup = BeautifulSoup(response.content,"html.parser")
print(soup.find(id="tw-answ-target-text").text)

개발업무 특성상 general log를 검색할 일이 자주 발생합니다.

적은양이 아니기에 notepad를 통해서는 검색이 제한적이기에

python을 활용해 특정 단어가 포함된 쿼리만을 추출해 보았습니다.

import os
import chardet
import pandas as pd
import numpy as np
from queue import Queue
from datetime import datetime

"""
입력된 값이 날짜형 값인지 검사
"""
def f_isDateTimeCheck(_inWord):
    try:
        dt_date = datetime.strptime(_inWord, '%Y-%m-%d')
    except Exception as ex:
        # print(ex)  # 여기 오류는 날짜 형식을 검증하기위한 부분이라 오류 로그를 찍으면 안됨
        return False 
    return True

"""
입려된 단어들이 본 Line에 모두 포함되는지 여부
"""
def f_QuerToStringAndFind(_line_queue, _findWordList):
    lineStr = ""
    findCnt = 0
    # 하나의 문자열로 결합
    while _line_queue.qsize() > 0:
        lineStr = lineStr + _line_queue.get()
    for str in _findWordList:   # 검색어 목록
        if str in lineStr:
            findCnt = findCnt + 1
    
    # print(findCnt, len(_findWordList), findCnt != len(_findWordList), lineStr)
    if findCnt != len(_findWordList):
        return "" 
    return lineStr

searchWordsList = ['Execute', '34356', 'like'] # 하나의 로그에 모두 포함되어 있어야 하는 검색어 목록
_line_queue = Queue()
_line_number_queue = Queue()

file_path = r'd:\generallog\20240611_generallog.log'
# 검색한 내용을 기록할 파일 생성
new_file_name = "%s/FindGeneralLog_%s.SQL" % (os.path.dirname(file_path), datetime.now().strftime('%Y%m%d%H%M%S'))
find_word_new_file = open(new_file_name, "w")

try:
	# 하나의 컬럼으로 만들어 주기위해 열구분자(sep)를 임이로 설정하였습니다.
    df_log = pd.read_table(file_path, sep='✱%*', encoding='UTF-8', encoding_errors='ignore', header=None, engine='python')
    query_cnt = 1
    for row in df_log.itertuples():
        try:
            _line_original = str(row[1])
            _line_original = _line_original.strip()     # 원본 내용, 앞뒤공백 삭제
            if len(_line_original) == 0:
                continue     # 공백행 무시
            
            # 라인의 앞 10자리가 날짜 형식이면 로그의 시작
            if f_isDateTimeCheck(_line_original[0:10]):
                _result = f_QuerToStringAndFind(_line_queue, searchWordsList)
                if len(_result) > 3:
                    findTab = _result.find("\t")
                    dt = datetime.fromisoformat(_result[0:findTab])
                    formatted_time_str = dt.strftime("%Y-%m-%d %H:%M:%S") + f".{int(dt.microsecond):05d}"   # 밀리초까지 기록
                    find_word_new_file.write("%s %s \n" % (formatted_time_str, _result[findTab:].replace("\n", " ")) )   # 찾은 Line에서 쿼리만 추출하여 파일에 기록
                    
            _line_queue.put(_line_original + '\n')
            _line_number_queue.put(row[0])
        except Exception as ex:
            print(ex)
            continue
except Exception as ex:
    print(ex)

find_word_new_file.close()
print("검색 작업이 완료되었습니다.")


외부 인터넷 접속이 되지 않는 환경에서  모듈을 설치하는 방법 입니다.

자주 사용하는 MySQL 모듈을 기준으로 설명드리겠습니다. 

1. https://pypi.org/ 사이트에 접속하여 다운받을 모듈과 버전 정보를 결정합니다.

    - https://pypi.org/project/PyMySQL/

    - https://pypi.org/project/PyMySQL/#history 버전 정보를 확인합니다.


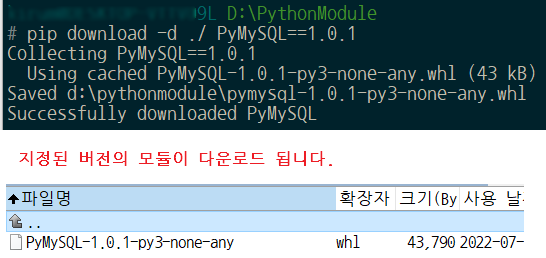
2.  cmd를 실행하여 아래와 같이 모듈 정보를 입력합니다.

pip download -d ./ PyMySQL==1.0.1

    위와 같이 실행시 SSL  오류가 발생하며 다운로드가 안된다면 아래와 같이 실행합니다.

pip --trusted-host pypi.org --trusted-host files.pythonhosted.org download -d ./ PyMySQL


    - 버전을 명시하지 않을 경우 최신 버전이 다운로드 됩니다.


3. 파일을 폐쇄망으로 이동시킵니다.


4. 아래 명령어를 통해서 다운받은 모듈을 설치합니다.

pip install --no-index --find-links=./ PyMySQL          << 특정 위치의 모듈을 설치할 경우

pip install --no-index --find-links=./ PyMySQL==1.0.2   << 특정 버전의 모듈을 설치할 경우

pip install --no-index PyMySQL                          << 모듈이 위치한 폴더에서 실행할 경우


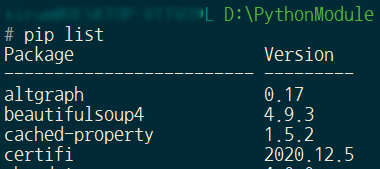
5. 설치된 모듈과 버전 정보를 확인합니다.

pip list

✳️ 첨부 파일은 Visual Studio 2017 프로젝트 파일입니다.

Python_Windows_Service.7z
0.09MB

Python으로 제작한 프로그램을 Windows Service로 만드는 가장 확실한 방법 입니다. 

준비물 : 

1. nssm : https://nssm.cc/download


NSSM - the Non-Sucking Service Manager

NSSM - the Non-Sucking Service Manager Windows 10, Server 2016 and newer 2017-04-26: Users of Windows 10 Creators Update or newer should use prelease build 2.24-101 or any newer build to avoid an issue with services failing to start. If for some reason you

nssm.cc

➔ 테스트 Project 파일과 함께 첨부해 놓았으나 최신 버전이 필요하시면 위 링크에서 다운로드 하시면 됩니다.


Service 등록 절차

✔️ Python 예제 프로그램

#_*_ coding: utf-8 _*_
import os
import sys
import time
import logging
from datetime import datetime, timedelta

def init():
    current_directory = os.path.dirname(os.path.realpath(__file__)) # .py 파일 위치
    current_log_directory = os.path.join(current_directory, "Log")  # 생성할 로그 폴더
    try:
        if not os.path.exists(current_log_directory):   # 로그 폴더 존재여부 검사
            os.makedirs(current_log_directory)          # 폴더 생성
    except OSError:
        print('----------------- Error -----------------')
        return -1

    # 로그파일 설정
    now_date_str = datetime.now().strftime('%Y%m%d_%H%M%S') # 현재 시간을 파일명으로 사용
    errorlogfilename = os.path.join(current_log_directory , "Log_%s.log" % (now_date_str))  # 로그파일의 전체 경로

    # 로그파일 생성
    logging.basicConfig(
        filename=errorlogfilename, 
        level=logging.DEBUG, 
        format='[%(asctime)s][%(name)s][%(levelname)s] - %(message)s'
    )
    return 1

def main():

    # 1초마다 로그파일에 현재 시간을 기록
    for i in range(10):
        out_message = "Now Time : %s" % (datetime.now().strftime('%Y-%m-%d_%H:%M:%S'))
        logging.info("Now Time : %s" % (out_message))
        print("Now Time : %s" % (out_message))
        time.sleep(1)

    return

if __name__ == '__main__':
    if (init() >= 1):
        while True:
            main()
            time.sleep(10)  # 10초마다 main() 함수 실행
    else:
        print("Exit")

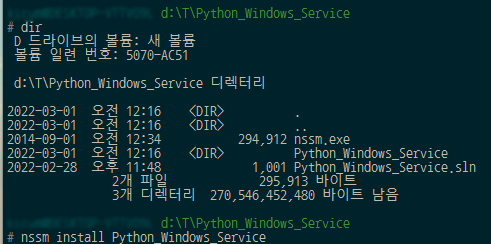
✔️ 관리자 권한으로 CMD를 실행하여 nssm이 보관된 폴더로 이동합니다.

✔️ nssm install [서비스명]을 입력합니다.


✔️ Path : Python 실행파일을 선택합니다. (Startup directory는 자동으로 채워집니다.)

     ex) C:\Users\kirum\AppData\Local\Programs\Python\Python39\python.exe

✔️ Arguments : xxxx.py 파일을 전체 경로를 입력합니다.

     ex) D:\T\Python_Windows_Service\Python_Windows_Service\Python_Windows_Service.py

✔️ Install service 클릭


✔️ 정상적으로 Service가 등록되었으며 시작/중지 모두 정상적으로 작동합니다.

안녕하세요. 

주식 정보를 수집할 때 사용한 파이썬 소스 공유 드립니다.


원하시는 분이 계셔서 공유하게 되었습니다.


책하나 사서 공부 했기에 , 구조가 이쁘지 않을 수 있습니다. 감안하고 받아 주세요


이클립스 프로젝트로 첨부 합니다.


Stock_Crawling 2.7z


>> 프로젝트 구조


Excel 파일을 읽어 DB에 insert 하는 Python 소스 공유 드립니다.

Python 3.6, Eclipse 에서 작업 하였습니다.


> Eclipse Project : 엑셀 파일을 읽어 DB에 저장 


- main.py : 메인 함수

- ClsDB.py : db 작업

- ClsLogHandler.py : Excel_Insert_Err_Log 파일에 오류 로그 저장


> Python Module : 아래 2가지 모듈은 추가로 설치하셔야 합니다.

- PyMySQL : mysql DB 처리 관련 모듈, https://github.com/PyMySQL/PyMySQL

- openpyxl :  Excel 처리 모듈 , http://openpyxl.readthedocs.io/en/default/


> DB Table

1
2
3
4
5
6
7
8
9
10
11
CREATE TABLE `TBL_STOCK` (
  `type_code` varchar(10NOT NULL,
  `basic_date` date NOT NULL,
  `open_value` float DEFAULT NULL COMMENT '시가',
  `high_value` float DEFAULT NULL COMMENT '고가',
  `low_value` float DEFAULT NULL COMMENT '저가',
  `close_value` float DEFAULT NULL COMMENT '종가',
  `adj_close_value` float DEFAULT NULL COMMENT '수정 주가',
  `volume_value` float DEFAULT NULL COMMENT '거래량',
  PRIMARY KEY (`type_code`,`basic_date`)
ENGINE=InnoDB DEFAULT CHARSET=utf8;
cs


> Source File Excel_Insert.zip


문의 및 의견은 댓글로 달아 주시길 바랍니다. 

코스피 증시 데이터를 수집하면서, CSV 파일을 DB에 등록할 필요가 있어 만들었습니다.


> 모듈 설명 : https://docs.python.org/3/library/csv.html


> Eclipse 에서 만들었으며, Pythoh 3.6 을 사용하였습니다.


  - main.py : CSV파일을 Read

  - DBCls : DB 처리

  - ClsLogHandler.py : 파일에 오류 로그 기록 


> Source File :        CSV_Insert.zip


질문이나 의견은 댓글로 부탁 드립니다. ^^


+ Recent posts